
As we continue our 26-day AWS journey, Day 3 focuses on something every beginner needs to master first: setting up your AWS Free Tier account. Without proper account setup, even the best AWS tutorials become meaningless. Curiosity Tech has observed that beginners often make mistakes at this stage—like accidentally selecting paid services or misconfiguring permissions. By following this guide, you’ll avoid common pitfalls and build a strong foundation for your AWS learning path.
Why AWS Free Tier Matters
The AWS Free Tier provides a risk-free environment for beginners to learn cloud computing without worrying about costs. It includes:
- 12 months free for core services like EC2, S3, and RDS.
- Always free services like Lambda, DynamoDB, and CloudWatch limited tiers.
- Hands-on practice for real-world scenarios without financial risk.
Think of the Free Tier as a sandbox provided by AWS, where your and experimentation are the only limits. At Curiosity Tech, we encourage students to practice daily in the Free Tier, which accelerates learning and confidence.
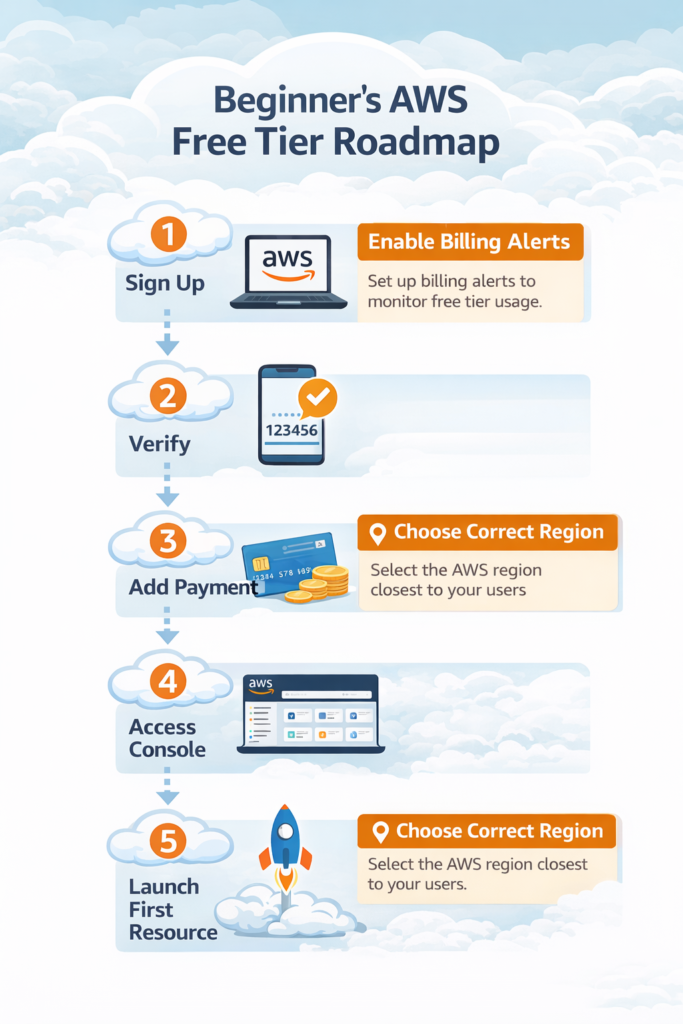
Step-by-Step Account Setup
Here’s a detailed walkthrough for beginners:
1. Create an AWS Account
- Visit https://aws.amazon.com.
- Click “Create an AWS Account”.
- Enter your email, password, and account name (use a professional identifier for learning projects).
- Verify your email via the OTP sent by AWS.
Expert Tip: Always use a personal email for learning and a work email for professional projects to keep billing separate.
2. Enter Contact Information
AWS requires:
- Name & phone number
- Address & country
Select Personal Account for beginners unless using for business projects.
| Field | Recommended Input |
| Account Type | Personal |
| Full Name | Your legal name |
| Phone Number | Active mobile for verification |
| Address | Accurate, local address |
Curiosity Tech guides students in filling these forms correctly to avoid account verification delays.
3. Add Payment Method
Even for the Free Tier, AWS requires credit/debit card details to prevent abuse.
- No charges for free-tier usage.
- AWS will temporarily charge $1 for verification, refunded automatically.
- Always monitor the billing dashboard to avoid accidental overuse.
Expert Tip: Beginners often forget to enable billing alerts. This is crucial to prevent surprise charges and develop good cloud financial habits early.
4. Identity Verification
- AWS will verify your account via SMS or voice call.
- Enter the PIN sent to your phone.
This ensures security and account authenticity.
5. Choose a Support Plan
- AWS provides Basic Support (Free) by default.
- For learning purposes, stick with Basic; upgrade later if needed for professional or production projects.
6. Access the AWS Management Console
Once verified, log in at https://aws.amazon.com/console.
Tip for beginners: Familiarize yourself with Service Menu, Regions, and Resource Dashboard.
CuriosityTech.in recommends starting with Ohio or Mumbai region, as most free-tier services are well-supported and latency is low.
Recommended Learning Path After Setup
| Service | Free Tier Limit | Suggested Hands-On Practice |
| EC2 | 750 hours/month (t2.micro) | Launch a virtual server, SSH access, deploy a simple web app |
| S3 | 5GB standard storage | Upload/download files, enable static website hosting |
| RDS | 750 hours/month, 20GB storage | Launch MySQL/PostgreSQL instance, practice CRUD operations |
| Lambda | 1M requests/month | Trigger function on file upload, simple automation |
| CloudWatch | 10 metrics/month | Monitor EC2 CPU usage, set alarms |
Expert Tip: Always start small. Use one service at a time, experiment, break things, and rebuild. This builds practical expertise faster than reading theory alone.
Hierarchical Diagram: AWS Account → Services → Free Tier

Infographic Concept
Common Beginner Mistakes
- Ignoring billing alerts → leads to surprise charges.
- Selecting paid ->tier services accidentally.
- Launching resources in the wrong region → latency & availability issues.
- Skipping MFA setup → security risk.
At Curiosity Tech, we simulate these mistakes in workshops so learners experience and resolve them safely. This builds both technical and problem-solving skills, which are essential for becoming an AWS Cloud Engineer.
How to Become Expert
- Daily practice: Launch EC2, S3, and Lambda in Free Tier.
- Document everything: Maintain a journal or blog of experiments.
- Experiment with integrations: Connect S3 → Lambda → RDS to understand real-world workflows.
- Follow Curiosity Tech tutorials & projects: They provide structured exercises for skill building.
Conclusion
Setting up your AWS Free Tier account is more than a formality—it’s your first step into cloud engineering. Doing it correctly ensures smooth learning, secure practice, and hands-on experience that’s transferable to professional environments. Curiosity Tech integrates real-world exercises at this stage to transform beginners into confident cloud learners, guiding them in every step from account creation to deploying their first project.