Introduction
Building a real-world blog application is an excellent exercise to tie together all Full Stack Python skills. From backend logic, database design, API creation, frontend integration, to deployment—this project incorporates everything a Python Full Stack developer needs to master.
At Curiosity Tech, we often use the blog app project as a capstone exercise for learners to apply knowledge in a structured, end-to-end development scenario.
Step 1: Database Design
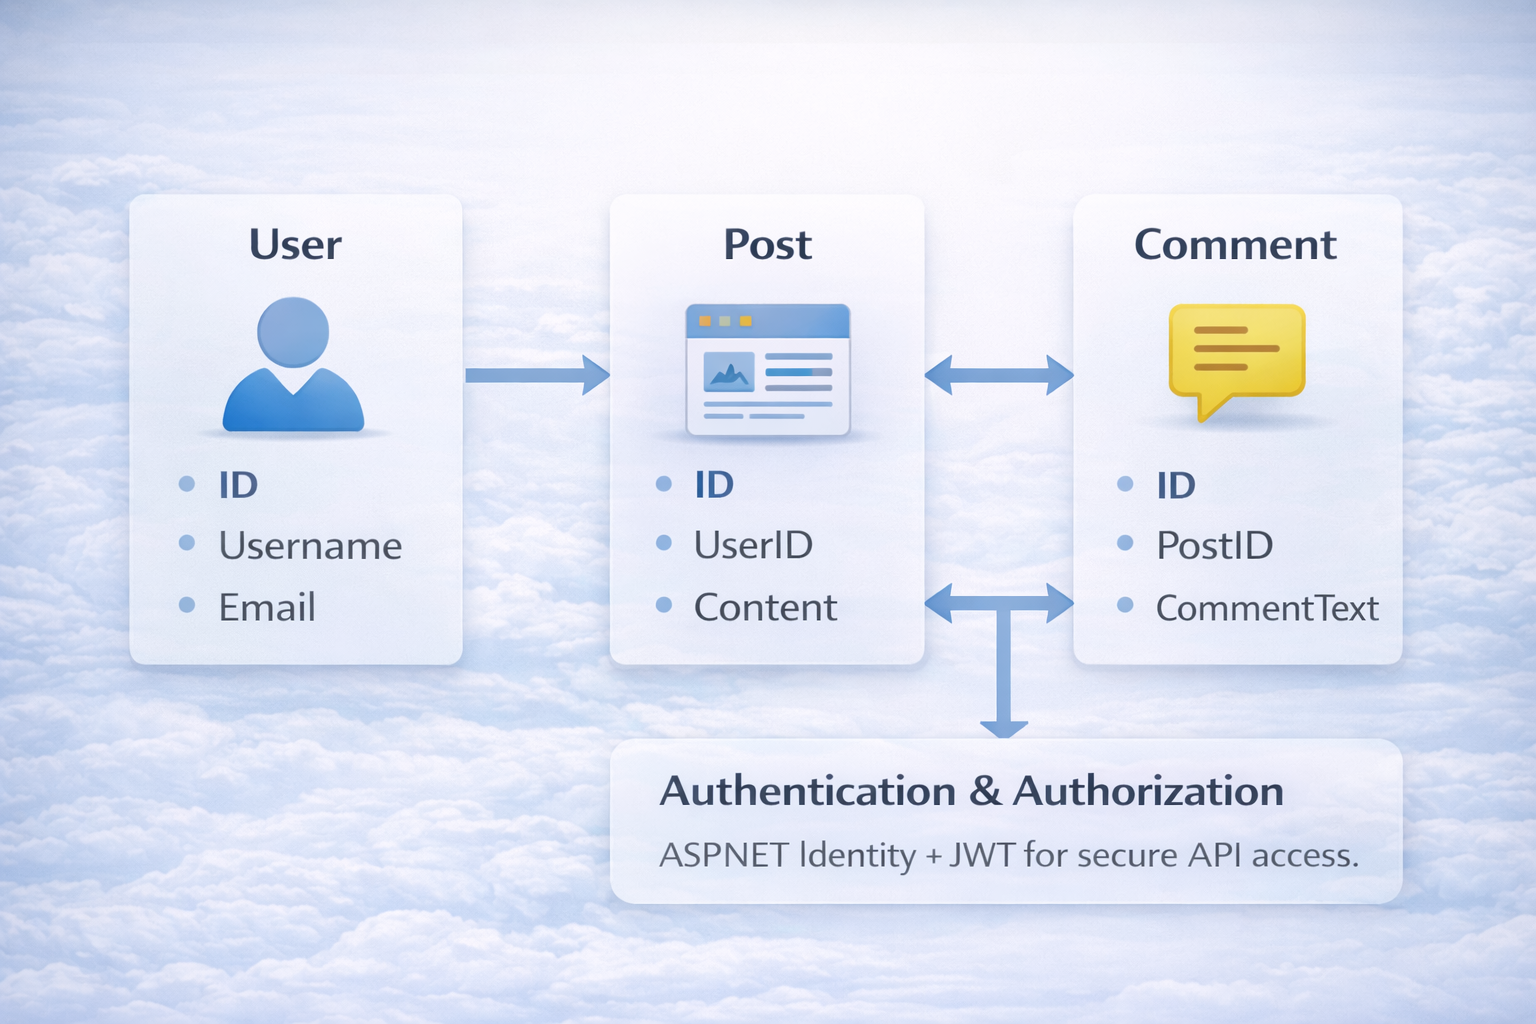
A simple blog application typically consists of the following models:
| Model | Fields | Relationships |
| User | id, username, email, password, role | One-to-Many → Posts |
| Post | id, title, content, created_at, updated_at, author | Many-to-One → User |
| Comment | id, content, post, author, created_at | Many-to-One → Post |
| Category | id, name, description | Many-to-Many → Post |
Diagram Idea: ER Diagram showing User → Post → Comment and Post ↔ Category relationships.
Step 2: Backend Setup
Django Example: Models
from django.db import models
from django.contrib.auth.models import User
class Category(models.Model):
name = models.CharField(max_length=50)
description = models.TextField()
class Post(models.Model):
title = models.CharField(max_length=100)
content = models.TextField()
created_at = models.DateTimeField(auto_now_add=True)
updated_at = models.DateTimeField(auto_now=True)
author = models.ForeignKey(User, on_delete=models.CASCADE)
categories = models.ManyToManyField(Category)
class Comment(models.Model):
content = models.TextField()
post = models.ForeignKey(Post, on_delete=models.CASCADE)
author = models.ForeignKey(User, on_delete=models.CASCADE)
created_at = models.DateTimeField(auto_now_add=True)
- Includes user authentication, post categorization, and comment system.
Flask Example: Models with SQLAlchemy
from flask_sqlalchemy import SQLAlchemy
from datetime import datetime
db = SQLAlchemy()
class User(db.Model):
id = db.Column(db.Integer, primary_key=True)
username = db.Column(db.String(50), unique=True, nullable=False)
email = db.Column(db.String(120), unique=True, nullable=False)
password = db.Column(db.String(128), nullable=False)
posts = db.relationship(‘Post’, backref=’author’, lazy=True)
class Post(db.Model):
id = db.Column(db.Integer, primary_key=True)
title = db.Column(db.String(100), nullable=False)
content = db.Column(db.Text, nullable=False)
created_at = db.Column(db.DateTime, default=datetime.utcnow)
author_id = db.Column(db.Integer, db.ForeignKey(‘user.id’), nullable=False)
Step 3: API Development
- Django REST Framework (DRF) or Flask-RESTful can be used.
DRF Example: Post Serializer & View
from rest_framework import serializers, viewsets
from .models import Post
class PostSerializer(serializers.ModelSerializer):
class Meta:
model = Post
fields = ‘__all__’
class PostViewSet(viewsets.ModelViewSet):
queryset = Post.objects.all()
serializer_class = PostSerializer
- API endpoints allow CRUD operations for posts, comments, and categories.
Step 4: Frontend Integration
Using React to Consume API
import React, { useEffect, useState } from ‘react’;
function BlogList() {
const [posts, setPosts] = useState([]);
useEffect(() => {
fetch(‘http://localhost:8000/api/posts/’)
.then(res => res.json())
.then(data => setPosts(data));
}, []);
return (
<div>
<h1>Blog Posts at CuriosityTech</h1>
{posts.map(post => (
<div key={post.id}>
<h2>{post.title}</h2>
<p>{post.content.substring(0, 150)}…</p>
</div>
))}
</div>
);
}
export default BlogList;
- Fetches dynamic posts from backend and displays them in SPA.
Step 5: Authentication & Authorization
- Django: Use built-in auth or JWT for API.
- Flask: Use Flask-Login and secure routes.
Example: Only the author can edit or delete their post.
# Django permission
from rest_framework.permissions import IsAuthenticated, BasePermission
class IsAuthor(BasePermission):
def has_object_permission(self, request, view, obj):
return obj.author == request.user
Step 6: Deployment
- Deploy backend on Heroku or AWS Elastic Beanstalk.
- Frontend (React) can be hosted on Netlify or Vercel.
- Connect API endpoints securely with CORS settings.
Full Stack Blog Architecture
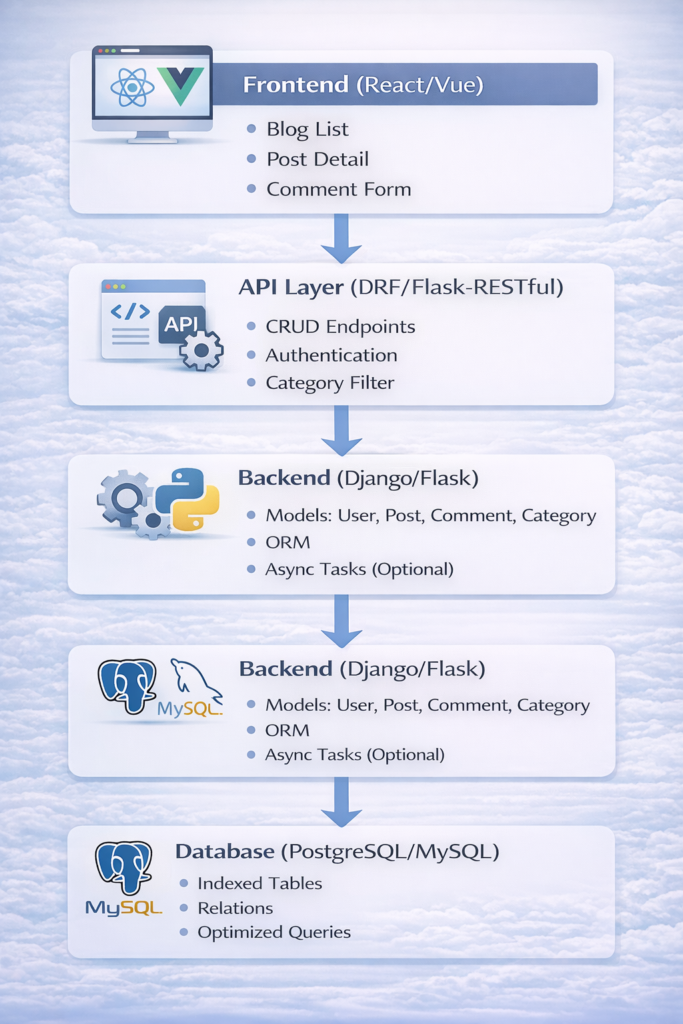
- Shows end-to-end Full Stack flow.
Best Practices
- Use serializers & validation to avoid malformed data.
- Paginate API responses for large datasets.
- Cache popular posts for performance.
- Implement role-based permissions for authors/admins.
- Test thoroughly with Pytest and Selenium.
Real-World CuriosityTech Example
- Students built a Full Stack blog platform:
- Backend: Django + DRF
- Frontend: React SPA
- Features: User authentication, post creation, comments, category filtering, search
- Deployment: AWS Elastic Beanstalk + Netlify frontend
- Outcome: A fully functional, production-ready blogging platform that integrated all CuriosityTech Full Stack teachings.
Conclusion
Building a Python Full Stack blog application is an excellent way to consolidate all essential skills: database modeling, API development, frontend integration, authentication, performance optimization, and deployment.
At Curiosity Tech, this case study is often the first real-world project for learners, preparing them for professional Full Stack development careers.