

Introduction
In modern cloud-native architecture, container orchestration is essential for deploying, managing, and scaling applications efficiently. Google Kubernetes Engine (GKE) provides a fully managed Kubernetes service on GCP, allowing engineers to run containerized applications without worrying about the underlying infrastructure.
At Curiosity Tech, we emphasize mastering GKE not just as a deployment tool but as a strategic platform for building resilient, scalable, and highly available applications. This guide provides an extensive deep dive into Kubernetes concepts, GKE architecture, practical steps, best practices, and real-world use cases.
Why Kubernetes on GCP?
| Feature | Benefit |
| Managed Infrastructure | GKE handles cluster provisioning, upgrades, and scaling automatically. |
| Auto-scaling | Pods and nodes scale based on workload automatically. |
| Integration with GCP Services | Easy connectivity with Cloud SQL, Cloud Storage, Pub/Sub, BigQuery. |
| Security & Compliance | IAM integration, private clusters, and role-based access control (RBAC). |
| Hybrid & Multi-Cloud Ready | Supports Anthos for hybrid deployments. |
GKE allows engineers to focus on application logic, CI/CD pipelines, and cloud-native patterns instead of infrastructure maintenance.
Core Kubernetes Concepts in GKE
- Cluster: A collection of nodes where containers are deployed.
- Node: Virtual machine in GCP that runs containerized workloads.
- Pod: Smallest deployable unit in Kubernetes, contains one or more containers.
- Deployment: Defines how pods are created, updated, and scaled.
- Service: Stable network endpoint for accessing pods.
- Ingress: HTTP/HTTPS routing into the cluster.
- Namespace: Logical separation for multi-environment deployments.
Diagram Concept: GKE Cluster Architecture

Step-by-Step Guide to Deploying an Application on GKE
Step 1: Create a GKE Cluster
gcloud container clusters create my-cluster \
–zone us-central1-a \
–num-nodes 3 \
–enable-autoscaling \
–min-nodes 1 \
–max-nodes 5
- Auto-scaling ensures efficient resource utilization.
- Choose regional or zonal clusters depending on HA requirements.
Step 2: Deploy a Containerized Application
- Containerize your application with Docker.
- Push the image to Google Container Registry (GCR) or Artifact Registry.
- Create a Deployment YAML file:
apiVersion: apps/v1
kind: Deployment
metadata:
name: webapp-deployment
spec:
replicas: 3
selector:
matchLabels:
app: webapp
template:
metadata:
labels:
app: webapp
spec:
containers:
– name: webapp
image: gcr.io/my-project/webapp:latest
ports:
– containerPort: 80
Step 3: Expose the Application
kubectl expose deployment webapp-deployment –type=LoadBalancer –port 80 –target-port 80
- Creates a Service with an external IP.
- Integrates with GCP Load Balancer automatically.
Step 4: Manage & Scale
- Scale deployment:
kubectl scale deployment webapp-deployment –replicas=5
- Check pod status:
kubectl get podsRolling updates: Update the container image without downtime.
Advanced GKE Features
1.Node Pools
- Separate workloads by node type (CPU-intensive, GPU, memory-intensive).
- Use preemptible nodes for cost optimization.
2. Horizontal Pod Autoscaling
- Automatically scale pods based on metrics like CPU or memory
kubectl autoscale deployment webapp-deployment –cpu-percent=70 –min=3 –max=10
3.Private Clusters
- Nodes do not have public IPs; traffic routed through Cloud NAT.
- Enhances security for sensitive workloads.
- Enhances security for sensitive workloads.
4. GKE Workload Identity
- Maps Kubernetes service accounts to GCP service accounts.
- Enables secure access to GCP APIs without embedding keys.
Practical Scenario: Multi-Tier Application Deployment
Scenario: Deploying an e-commerce platform.
- Frontend Pods: Serve web application.
- Backend Pods: Handle API logic and connect to Cloud SQL.
- Database: Cloud SQL instance connected via private IP.
- Cache Layer: Redis cluster for session management.
- Ingress Controller: Route traffic, SSL termination, and path-based routing.
Diagram Concept: Multi-Tier GKE Architecture
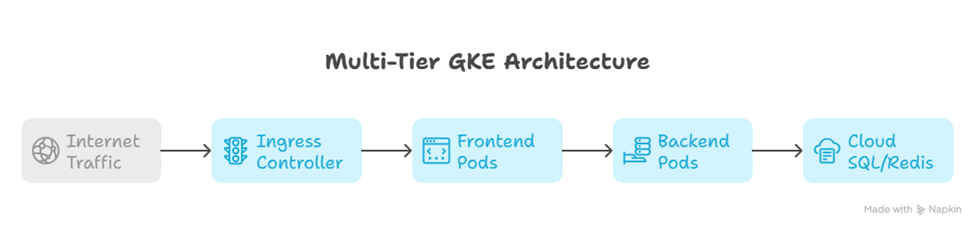
This setup demonstrates scalable, highly available, and secure architecture, fully leveraging GKE capabilities.
Best Practices for GKE
- Use Namespaces: Separate dev, staging, and production environments.
- RBAC & IAM Integration: Assign least privilege access for developers and service accounts.
- Monitor with Cloud Monitoring & Logging: Track pod health, resource usage, and errors.
- Optimize Costs: Use node pools, preemptible VMs, and autoscaling.
- Security Best Practices: Enable private clusters, network policies, and GKE Workload Identity.
Conclusion
Mastering Kubernetes on GKE allows cloud engineers to design resilient, scalable, and efficient cloud-native applications. By understanding cluster architecture, deployment strategies, autoscaling, and security best practices, engineers can handle enterprise-grade workloads with confidence.
Curiosity Tech provides hands-on labs, real-world multi-tier projects, and practical guides for engineers to gain expertise in GKE deployment and management, preparing them for advanced cloud roles and certifications.

