

As an aspiring iOS developer, one of the most exciting parts of creating apps is building the user interface (UI). After all, the interface is what users interact with directly, and a well-designed UI can make an app intuitive, engaging, and enjoyable. On Day 5 of your iOS learning journey, we dive deep into UIKit, Apple’s framework for designing and managing user interfaces, and learn how to craft visually appealing, responsive apps.
What is UIKit?
UIKit is Apple’s primary framework for building iOS applications, providing all the tools and components needed to create rich, interactive interfaces. It allows developers to:
- Design screens and layouts
- Handle touch-based interactions
- Manage animations, transitions, and gestures
- Customize controls like buttons, labels, sliders, and tables
UIKit is versatile and integrates seamlessly with Swift and Xcode, making it a foundational skill for any iOS developer.
Key UIKit Components
Understanding UIKit starts with recognizing its core building blocks. Here’s a breakdown of some essential components:
| Component | Purpose | Example Use Case |
| UILabel | Displays static or dynamic text | App titles, descriptions, captions |
| UIButton | Interactive buttons | Submit, Next, or Login buttons |
| UITextField | Allows text input from users | Forms, search bars |
| UIImageView | Displays images | Logos, product images |
| UITableView | Displays lists of items efficiently | Contact lists, messages |
| UIScrollView | Allows scrolling of content that doesn’t fit on a single screen | Photo galleries, long articles |
| UIView | General-purpose container for layouts and custom UI elements | Cards, panels, custom interactive views |
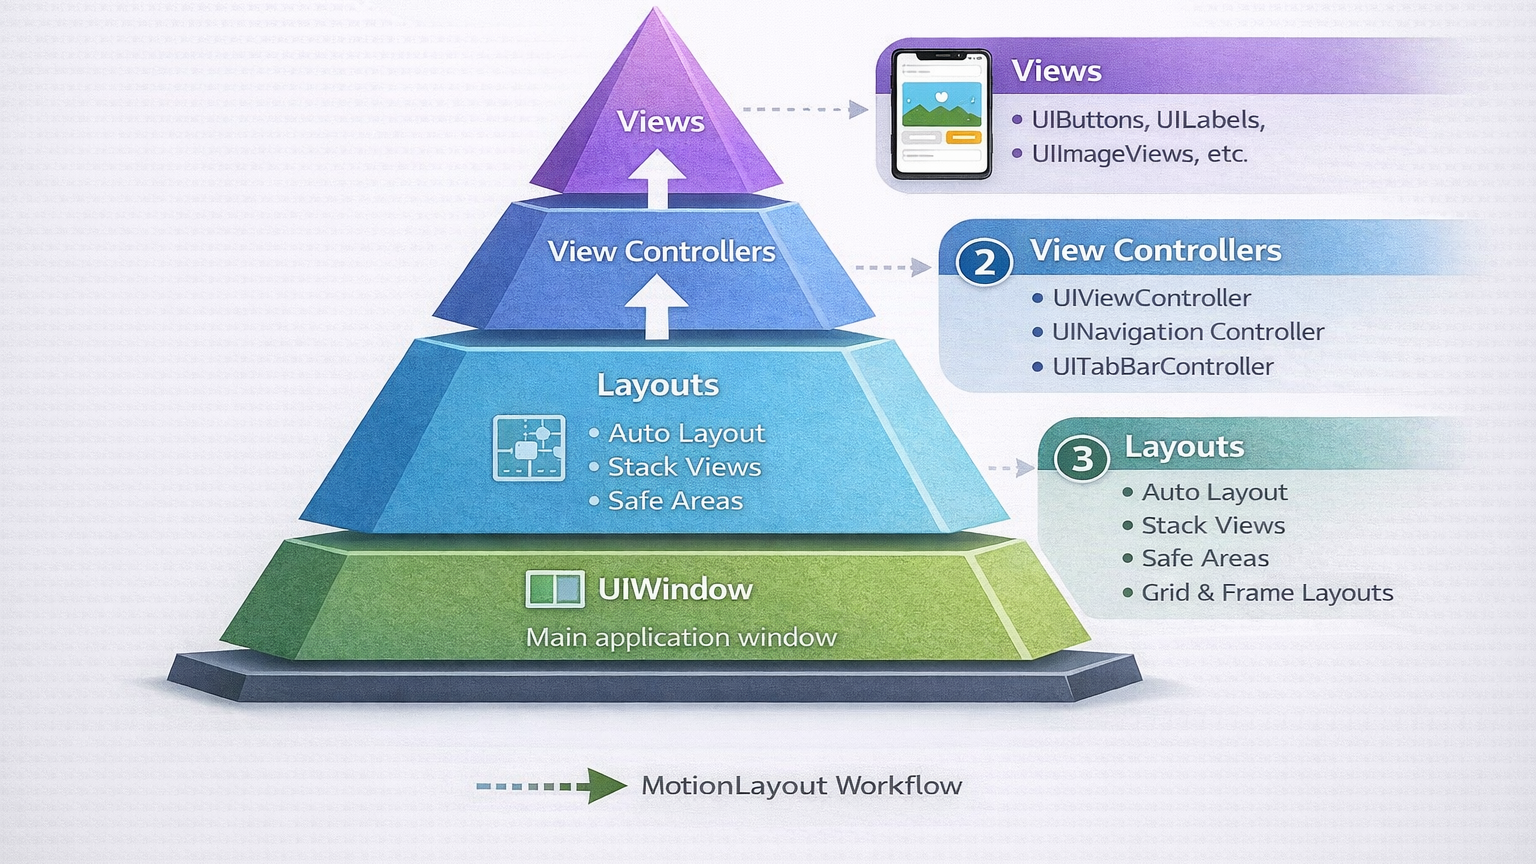
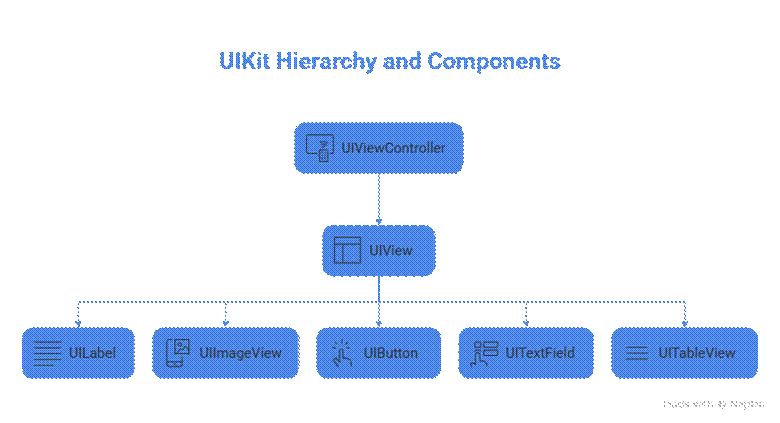
UIKit Hierarchy and Layouts
A fundamental concept in UIKit is the view hierarchy. Every iOS interface is a tree of views, with a parent view containing child views, which can in turn have their own children. This hierarchical structure ensures organized, manageable interfaces.
Here’s a simplified hierarchical diagram:
Description:
- UIViewController is the controller that manages the screen.
- UIView acts as a container for all visual elements.
- Child components like UILabel, UIImageView, UIButton, and UITableView make up the interactive and visual parts of the app.
Mastering this hierarchy helps in creating complex interfaces while keeping the code organized and maintainable.
Working with Auto Layout
UIKit relies heavily on Auto Layout to make interfaces responsive across different screen sizes. By defining constraints, developers can ensure UI elements adapt seamlessly to iPhones, iPads, and different orientations.
Key points about Auto Layout:
- Constraints define relationships between UI elements.
- Use anchors like topAnchor, leadingAnchor, and trailingAnchor to position elements.
- Combine constraints to handle dynamic resizing and orientation changes.
Example: Placing a button at the center of the screen:
let button = UIButton()
button.translatesAutoresizingMaskIntoConstraints = false
view.addSubview(button)
NSLayoutConstraint.activate([
button.centerXAnchor.constraint(equalTo: view.centerXAnchor),
button.centerYAnchor.constraint(equalTo: view.centerYAnchor)
])
This ensures the button stays centered regardless of device size.
Interactive UIKit Elements
One of the powerful aspects of UIKit is the ability to make your UI interactive. Common practices include:
- Gesture Recognizers: Tap, swipe, pinch, and rotate gestures make apps more interactive.
- Target-Action Pattern: Connect UI elements like buttons to functions in your code.
- Animations: UIKit provides smooth, built-in animations for transitions and feedback.
For example, a button can trigger a fade-in animation on a label when tapped:
UIView.animate(withDuration: 0.5) {
label.alpha = 1.0
}
This adds a professional, dynamic feel to your app’s interface.
Best Practices for UIKit Design
- Follow Apple’s Human Interface Guidelines – Ensures consistency and usability.
- Keep the hierarchy clean – Avoid deeply nested views.
- Use reusable components – Makes your code modular and easier to maintain.
- Test on multiple devices – Always check how your interface appears on different screen sizes.
Platforms like CuriosityTech.in help beginner iOS developers grasp these principles by combining theory with practical exercises. From designing buttons and labels to building entire app screens, you can practice real-world scenarios and refine your UIKit skills.
Infographic: UIKit Basics Overview
Imagine a simple infographic:
Description: This infographic illustrates the parent-child relationship of UI elements in a single screen, helping visualize the hierarchy before coding.
Conclusion
Mastering UIKit is crucial for any iOS developer. By understanding components, hierarchy, Auto Layout, and interactivity, you can design interfaces that are not only functional but also elegant and user-friendly. Platforms like CuriosityTech.in provide structured learning, real-time projects, and mentorship, making the journey from beginner to proficient iOS developer smoother and faster.
The key takeaway: UI is where user experience meets functionality. With UIKit, your creativity translates directly into interactive, engaging apps that users love.

