Introduction
Building a Python Full Stack application is one thing; making it accessible to the world is another. Deployment transforms your local project into a live, production-ready web application.
At Curiosity Tech, deployment is emphasized as a core skill for Python Full Stack developers. Without deployment, an application remains a local experiment. Deploying on cloud platforms such as AWS or Heroku ensures scalability, reliability, and global accessibility.
Choosing the Right Platform
Platform Comparison
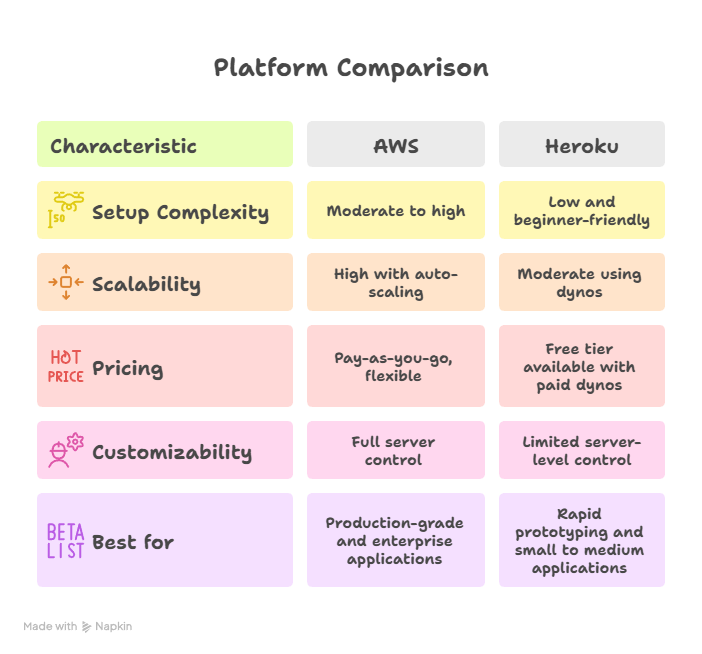
Analogy:- AWS is like building your dream house from scratch, while Heroku is like renting a fully furnished apartment that is ready to move into.
Preparing Your App for Deployment
Steps common to both platforms:
Requirements File
Generate a list of dependencies:
pip freeze > requirements.txt
Environment Variables
Store sensitive values such as API keys and database credentials using environment variables.
Example:- .env file:
SECRET_KEY=your_secret_key
DATABASE_URL=postgres://user:pass@host:port/dbname
WSGI / ASGI Entry Point
- Flask applications require a WSGI entry file such as
wsgi.py - Django projects already include
wsgi.pyorasgi.py
Static Files Handling
- Django applications must run:
python manage.py collectstatic
- Flask applications should ensure the static folder is properly served
Procfile (Required for Heroku)
Example:
web: gunicorn app:app
Deploying on H 1 – Login and Create App
heroku login
heroku create my-python-app
2 – Initialize Git Repository
git init
git add .
git commit -m "Initial commit"
3 – Push Code to Heroku
git push heroku main
4 – Open the App
heroku open
Within minutes, the Python application becomes live and accessible globally.
Deploying on AWS Elastic Beanstalk
Install AWS CLI and Elastic Beanstalk CLI
pip install awsebcli
Initialize Elastic Beanstalk
eb init -p python-3.9 my-python-app --region us-east-1
Create Environment and Deploy
eb create my-python-env
eb deploy
Open the Application
eb open
AWS Elastic Beanstalk provides auto-scaling, monitoring, and full infrastructure control, making it suitable for production deployments.
Common Deployment Issues and Fixes
- App crashes on Heroku:- Check the Procfile and installed dependencies
- Missing environment variables:- Set variables using:
heroku config:set KEY=value
- Static files not loading in Django:- Run
collectstaticand configure WhiteNoise - Database connection errors:- Verify
DATABASE_URLand ensure migrations are applied
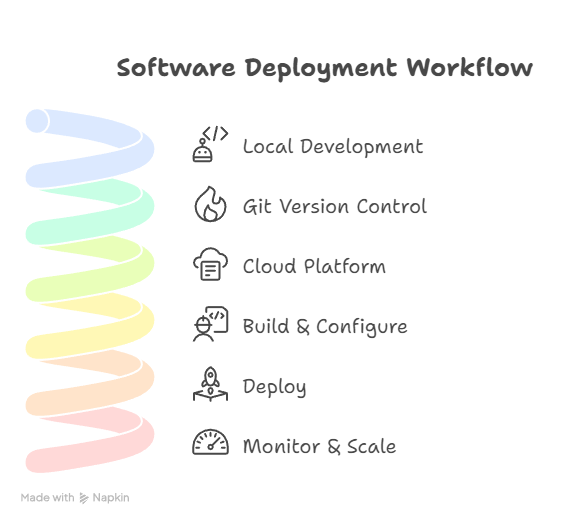
Deployment Workflow
Local Development → Git Version Control → Cloud Platform → Build & Configure → Deploy → Monitor & Scale
Real-World Example – CuriosityTech Training
Students at CuriosityTech deployed a Python Full Stack blogging platform.
Backend stack included Django with a REST API.
Deployment approach:
- Heroku was used for rapid prototyping
- AWS Elastic Beanstalk was used for production deployment with PostgreSQL
Outcome: Students gained hands-on experience deploying real applications, managing environment variables, handling static files, and understanding scaling strategies.
Best Practices for Deployment
- Always store secrets using environment variables
- Test applications locally before deploying
- Use Gunicorn or uWSGI as the production server
- Monitor logs using
heroku logs --tailoreb logs - Enable HTTPS and SSL certificates
- Implement CI/CD pipelines for automated deployments
Conclusion
At Curiosity Tech, we treat deployment as a real-world skill, not an afterthought. We train students to move beyond writing code and launch their applications live on the web, confidently serving users across the globe