
Introduction
Cloud deployment has become an essential skill for Java Full Stack Developers. Hosting applications on cloud platforms like AWS, Azure, or GCP allows for scalability, high availability, and cost-efficient infrastructure. Instead of relying on local servers, developers can deploy Java applications globally, ensuring fast, reliable, and secure access for users.
At CuriosityTech.in, developers learn how to deploy full stack applications in production environments, integrating cloud services with backend APIs and databases.
Why Cloud Deployment Matters
- Scalability: Automatically handle growing user traffic.
- High Availability: Cloud providers ensure your application stays online with redundancy.
- Security: Managed security services protect sensitive data.
- Professional Skillset: Cloud deployment knowledge is highly valued in enterprise-level jobs.
Step 1: Deploying Java Applications on AWS
1. Launch EC2 Instance
- Log in to AWS Management Console
- Navigate to EC2 → Launch Instance
- Choose Amazon Linux 2 or Ubuntu image
- Configure security group: allow HTTP (80), HTTPS (443), and SSH (22)
2. Install Java & Tomcat
sudo yum update -y
sudo yum install java-17-amazon-corretto -y
wget https://downloads.apache.org/tomcat/tomcat-10/v10.1.10/bin/apache-tomcat-10.1.10.tar.gz
tar -xvzf apache-tomcat-10.1.10.tar.gz
cd apache-tomcat-10.1.10/bin
./startup.sh
3. Deploy Your WAR File
- Upload your Spring Boot WAR file using SCP :- scp target/yourapp.war ec2-user@<EC2_PUBLIC_IP>:/home/ec2-user/
- Move WAR to Tomcat’s webapps directory and restart Tomcat.
Step 2: Deploying on Azure
1. Create App Service
- Go to Azure Portal → App Services → Create
- Choose Java runtime and Tomcat server
2. Deploy WAR File
- Use FTP/Zip Deployment or Azure CLI:
az webapp deploy –resource-group MyResourceGroup –name MyJavaApp –src-path target/yourapp.war
3. Verify Deployment
- Open the App Service URL in a browser
- Ensure your application is running and accessible globally
Step 3: Deploying on Google Cloud Platform (GCP)
1. Create Compute Engine
- Go to GCP Console → Compute Engine → VM Instances → Create
- Select Ubuntu image, allow HTTP/HTTPS traffic
2. Install Java & Tomcat
sudo apt update
sudo apt install openjdk-17-jdk -y
wget https://downloads.apache.org/tomcat/tomcat-10/v10.1.10/bin/apache-tomcat-10.1.10.tar.gz
tar -xvzf apache-tomcat-10.1.10.tar.gz
cd apache-tomcat-10.1.10/bin
./startup.sh
3. Deploy WAR File
- Upload using SCP and place it in the Tomcat webapps folder
- Start Tomcat server and test your application
Step 4: Cloud Deployment Workflow Diagram
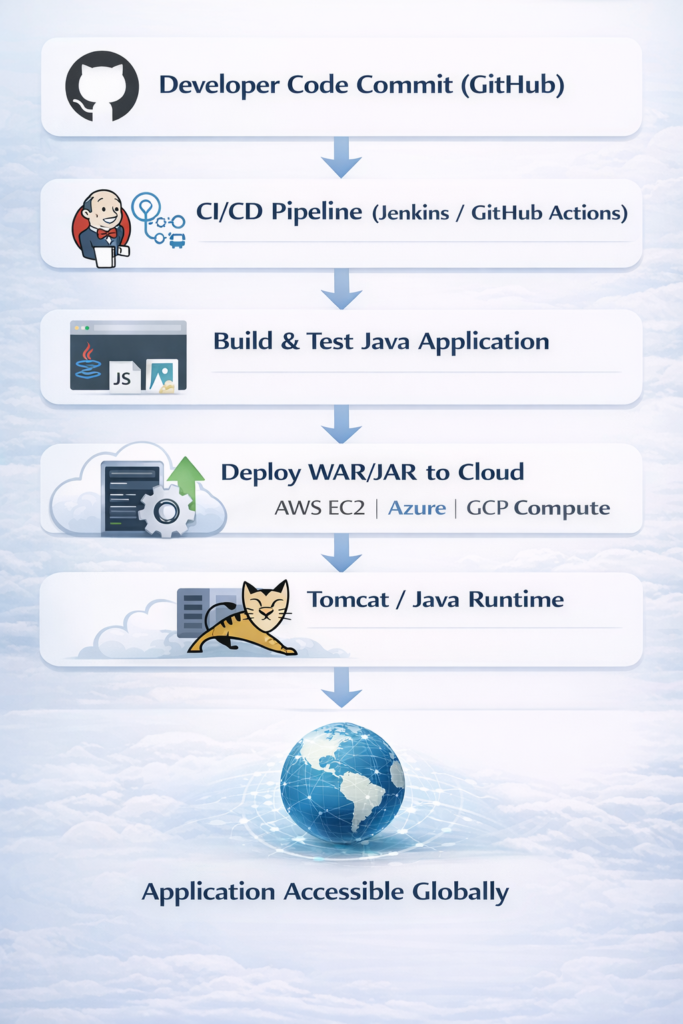
Description :- This diagram demonstrates the full deployment lifecycle, from development to production, leveraging CI/CD and cloud services for global access and scalability.
Step 5: Best Practices
- Use environment variables for credentials instead of hardcoding.
- Enable HTTPS using SSL/TLS certificates.
- Monitor logs and performance with cloud monitoring tools.
- Automate deployments using CI/CD pipelines for faster releases.
- Scale vertically or horizontally depending on user traffic.
Integrating CuriosityTech Perspective
At CuriosityTech.in, learners deploy full stack applications in AWS, Azure, and GCP environments, simulating enterprise scenarios. Students gain hands-on experience with Tomcat, Spring Boot, database integration, and global deployment strategies, ensuring they are cloud-ready full stack developers.
Conclusion
Cloud deployment is no longer optional—it is essential for modern Java Full Stack Developers. Hosting applications on AWS, Azure, or GCP ensures scalability, security, and reliability. With guidance from CuriosityTech.in, developers gain practical expertise in deploying production-ready applications, preparing them for enterprise-level projects.