
Introduction
Combining React with Java Spring Boot is a powerful approach for building modern Full Stack applications. React handles the frontend, offering fast, interactive, and dynamic user interfaces, while Spring Boot powers the backend, managing business logic, data processing, and database interactions.
At CuriosityTech.in, we teach developers not just to code, but to integrate frontend and backend seamlessly, preparing them for real-world enterprise projects. This guide demonstrates how to connect React with a Java backend to create a robust full stack application.
Why React + Java?
- Separation of Concerns: React handles UI, Java handles server-side logic.
- Reusability: React components can be reused across pages and projects.
- Scalability: Spring Boot handles scalable REST APIs, while React efficiently manages state and updates.
- Faster Development: Frontend and backend can be developed independently, enabling parallel development.
CuriosityTech.in ensures learners understand integration patterns, giving them confidence to work on professional full stack projects.
Step 1: Setting Up the Backend (Spring Boot)
1. Create Spring Boot Project
- Use Spring Initializr
- Dependencies: Spring Web, Spring Data JPA, MySQL Driver, Lombok
2. Model Class
@Entity
@Data
@NoArgsConstructor
@AllArgsConstructor
public class Product {
@Id
@GeneratedValue(strategy = GenerationType.IDENTITY)
private Long id;
private String name;
private Double price;
}
3. Repository
@Repository
public interface ProductRepository extends JpaRepository<Product, Long> {}
4. REST Controller
@RestController
@RequestMapping(“/api/products”)
@CrossOrigin(origins = “http://localhost:3000”)
public class ProductController {
@Autowired
private ProductRepository repo;
@GetMapping
public List<Product> getAll() { return repo.findAll(); }
@PostMapping
public Product create(@RequestBody Product product) { return repo.save(product); }
}
Note: @CrossOrigin allows React frontend to communicate with Java backend during development.
Step 2: Setting Up the Frontend (React)
1. Create React App
npx create-react-app react-java-fullstack
cd react-java-fullstack
npm start
2. Fetch Data from Backend
import React, { useEffect, useState } from “react”;
function App() {
const [products, setProducts] = useState([]);
const [name, setName] = useState(“”);
const [price, setPrice] = useState(“”);
useEffect(() => {
fetch(“http://localhost:8080/api/products”)
.then(res => res.json())
.then(data => setProducts(data));
}, []);
const addProduct = () => {
fetch(“http://localhost:8080/api/products”, {
method: “POST”,
headers: { “Content-Type”: “application/json” },
body: JSON.stringify({ name, price: parseFloat(price) })
})
.then(res => res.json())
.then(product => setProducts([…products, product]));
};
return (
<div>
<h1>Products</h1>
<input placeholder=”Name” value={name} onChange={e => setName(e.target.value)} />
<input placeholder=”Price” type=”number” value={price} onChange={e => setPrice(e.target.value)} />
<button onClick={addProduct}>Add Product</button>
<ul>
{products.map(p => (<li key={p.id}>{p.name} – ${p.price}</li>))}
</ul>
</div>
);
}
export default App;
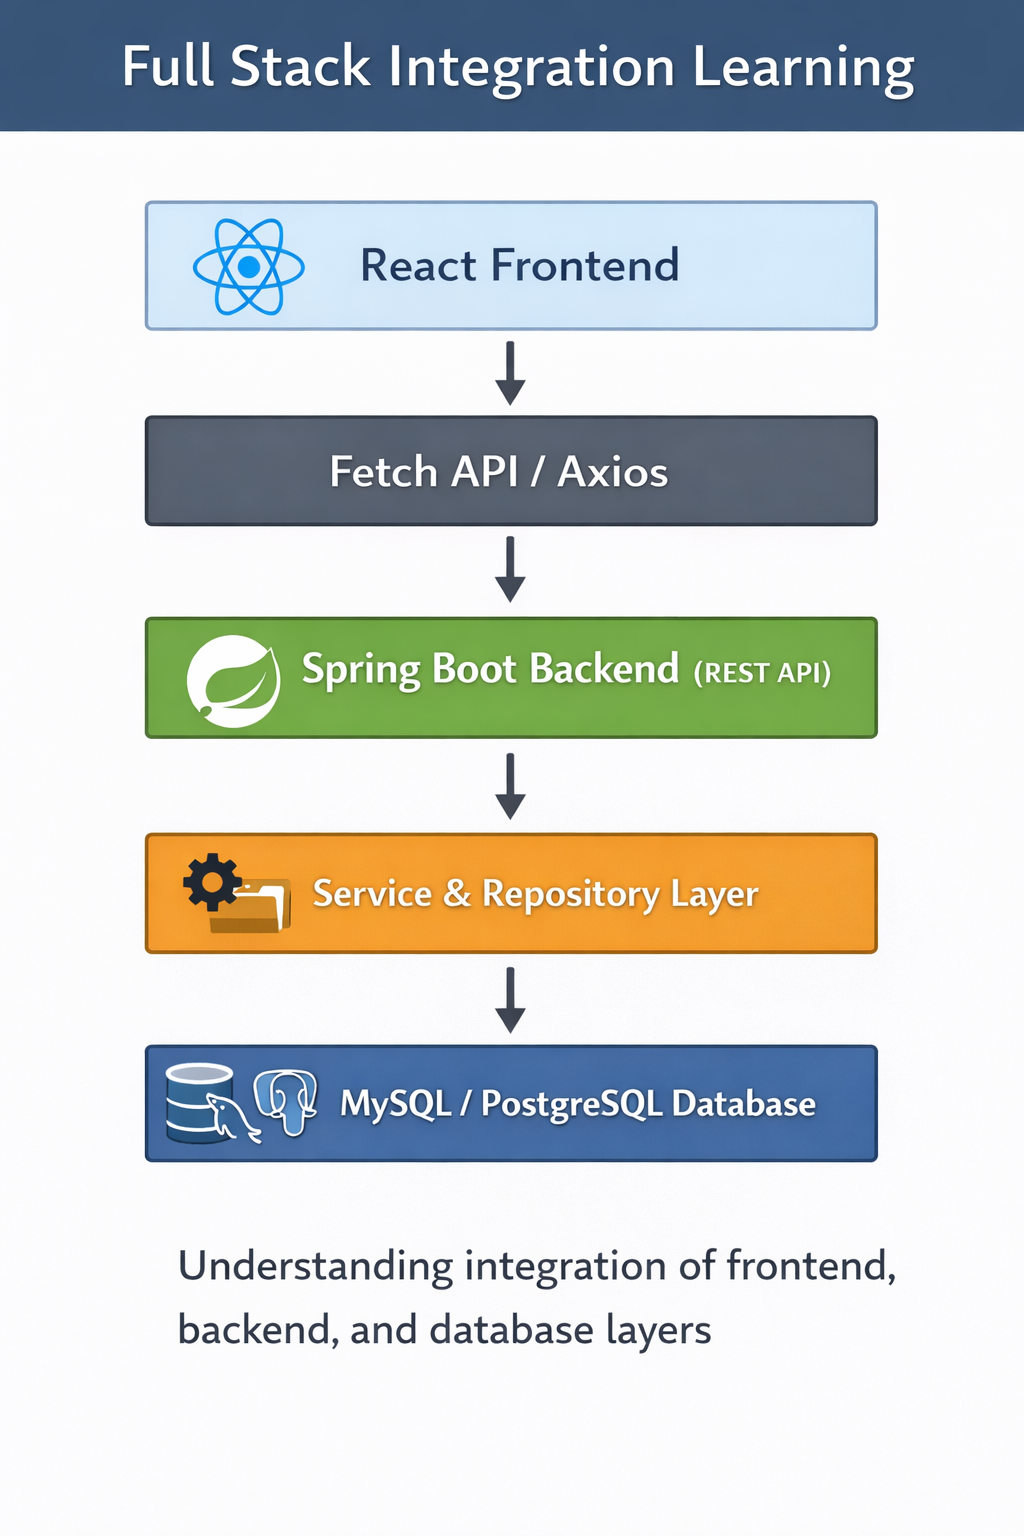
Step 3: Full Stack Workflow Diagram

Description: React sends HTTP requests to Spring Boot REST APIs. The backend processes requests, interacts with the database, and responds with JSON, which React renders dynamically.
Step 4: Best Practices
- Use Axios or Fetch for API calls in React.
- Keep frontend and backend separate for maintainability.
- Implement environment variables for backend URLs.
- Use React Hooks (useState, useEffect) for state management.
- Handle errors gracefully and provide user feedback.
- Enable CORS only for trusted origins.
Integrating CuriosityTech Perspective
Conclusion
Combining React with Java Spring Boot allows developers to build high-performance, interactive, and scalable full stack applications. By following practical steps and best practices, and leveraging guidance from CuriosityTech.in, developers can confidently build professional projects that demonstrate both frontend finesse and bac