
Introduction
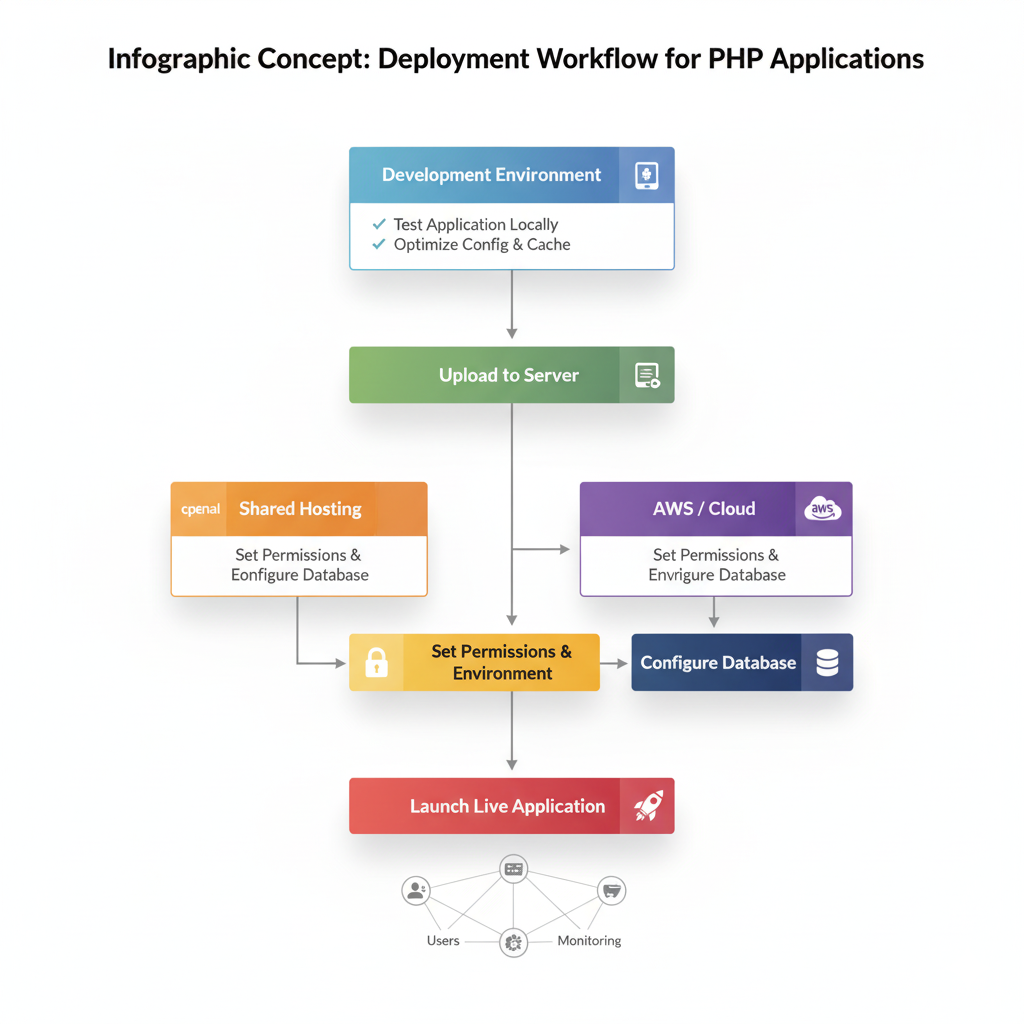
On Day 18, we explore deploying PHP applications, both on shared hosting and cloud platforms like AWS. Deployment is a crucial step that transforms your locally developed application into a live, accessible web application.
At CuriosityTech.in, learners gain hands-on experience deploying Laravel and PHP projects, ensuring they understand server setup, database configuration, security, and scalability.
1. Deployment Options for PHP Applications
| Platform | Description | Use Case |
| Shared Hosting | Affordable, easy-to-use hosting with cPanel | Small websites, blogs, portfolios |
| VPS / Cloud (AWS EC2) | Virtual servers with full control | Scalable web apps, e-commerce, APIs |
| Managed Cloud Services (AWS Elastic Beanstalk, Forge) | Automates deployment and scaling | Professional, high-traffic applications |
2. Deploying on Shared Hosting
Step 1: Prepare Your Project
- For Laravel, run:
composer install –optimize-autoloader –no-dev
php artisan config:cache
php artisan route:cache
php artisan view:cache
- Compress the project folder for upload.
Step 2: Upload Files via cPanel
- Log in to cPanel → File Manager → public_html
- Upload project files (Laravel public folder contents go into public_html)
Step 3: Set Environment Variables
- Create .env file with database, app URL, and mail settings
- Update APP_URL to your domain
Step 4: Set Folder Permissions
chmod -R 775 storage bootstrap/cache
Step 5: Database Migration
- Import .sql file via phpMyAdmin
- Update Laravel .env with DB credentials
3. Deploying on AWS EC2
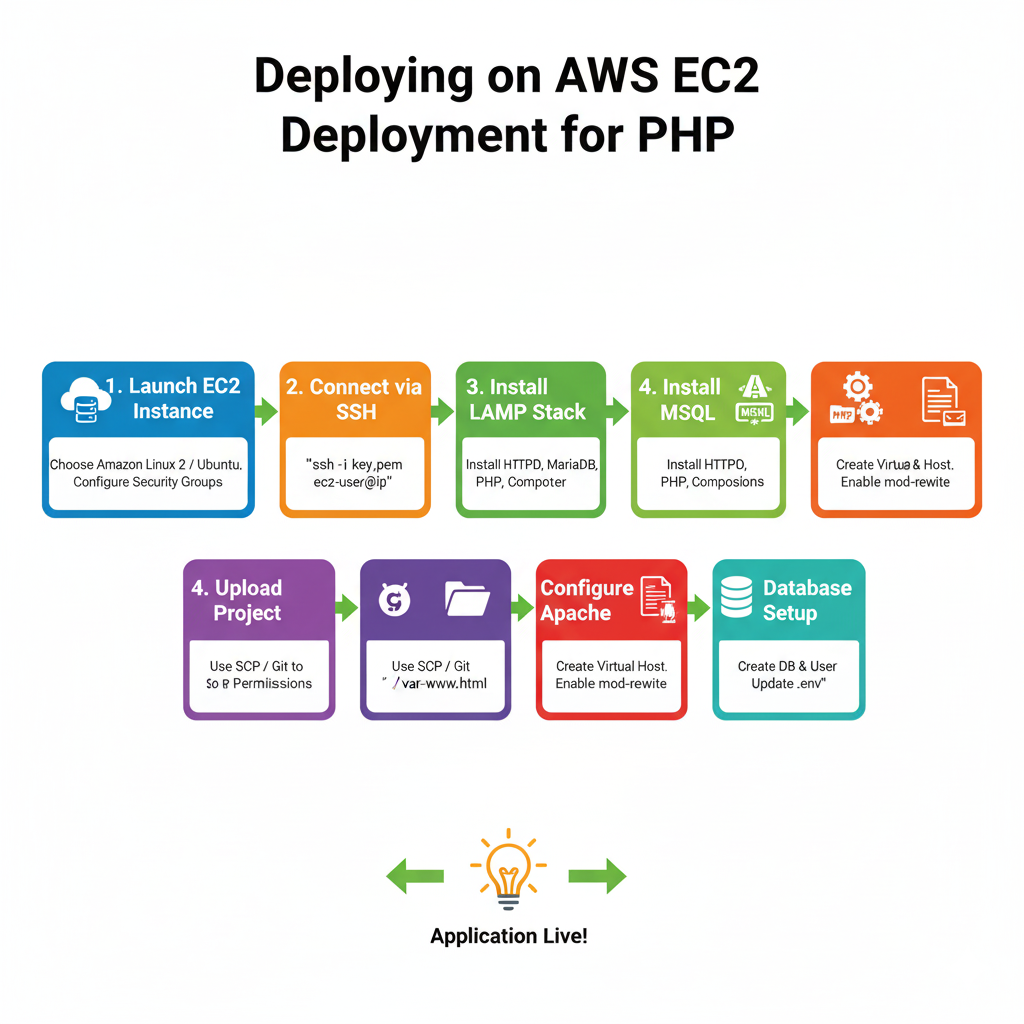
Step 1: Launch EC2 Instance
- Choose Amazon Linux 2 or Ubuntu
- Assign security groups for HTTP, HTTPS, and SSH
Step 2: Connect via SSH
ssh -i “your-key.pem” ec2-user@your-ec2-ip
Step 3: Install LAMP Stack
sudo yum update -y
sudo yum install -y httpd mariadb-server php php-mbstring php-mysqlnd php-xml composer unzip
sudo systemctl start httpd
sudo systemctl enable httpd
Step 4: Upload Project
- Use SCP or Git to upload project to /var/www/html
- Set permissions for storage and cache:
sudo chown -R apache:apache /var/www/html/your-project
sudo chmod -R 775 /var/www/html/your-project/storage /var/www/html/your-project/bootstrap/cache
Step 5: Configure Apache
- Create Virtual Host:
<VirtualHost *:80>
ServerName yourdomain.com
DocumentRoot /var/www/html/your-project/public
<Directory /var/www/html/your-project/public>
AllowOverride All
Require all granted
</Directory>
</VirtualHost>
- Enable .htaccess and mod_rewrite
Step 6: Database Setup
- Install MySQL/MariaDB
- Create database and user
- Import your SQL data
- Update .env file with credentials
Step 7: Start Application
php artisan serve –host = 0.0.0.0 –port=80
Alternatively, use Apache or Nginx to serve Laravel in production.
4. Deployment Checklist
| Task | Status |
| Composer dependencies installed | ✅ |
| .env configured | ✅ |
| Folder permissions set | ✅ |
| Database imported | ✅ |
| Cache & config optimized | ✅ |
| HTTPS (SSL) setup | ✅ |
5. CuriosityTech.in Perspective
At CuriosityTech.in, learners deploy their PHP and Laravel projects live, gaining practical experience with:
- Shared hosting for small-scale apps
- AWS EC2 for scalable, production-ready apps
- Security considerations like folder permissions, environment variables, and HTTPS
This hands-on experience ensures that students not only develop applications but also successfully launch them for real-world usage.
6. Infographic Concept: Deployment Workflow
Conclusion
Deployment is a critical stage of full-stack development. By learning both shared hosting and AWS deployment, developers can confidently launch professional PHP applications. Mastery of deployment prepares developers for security best practices (Day 19) and production-ready application management.

