Introduction
Azure Virtual Machines (VMs) are the cornerstone of cloud computing, enabling you to run applications in a flexible, scalable, and secure environment. For cloud engineers, mastering VMs is essential because they represent the compute layer of almost every cloud solution.
At curiosity tech, we emphasize learning by doing—starting from creating a VM to configuring advanced networking and security, providing learners with practical expertise that is directly applicable in real-world enterprise scenarios.
Scenario-Based Learning Approach
Imagine you are a cloud engineer tasked with deploying a web application for a startup. The startup requires:
- Backend compute resources to handle application logic
- Secure connectivity
- High availability for users worldwide
Your first step will be deploying a Virtual Machine in Azure.
1. Azure VM Fundamentals
Key Concepts:
- VM Sizes: Determines CPU, RAM, and disk I/O capabilities. Examples include B-series (economy), D-series (general purpose), E-series (memory optimized).
- Images: OS options like Windows Server, Ubuntu, Red Hat, etc.
- Regions & Availability Zones: Ensure low-latency access and high availability.
- Networking: Assign a Virtual Network (VNet), subnet, and public IP.
- Disks: OS disk + optional data disks. Types include SSD (premium) and HDD (standard).
| Series | CPU vCores | RAM | Best Use Case |
| B-Series | 1–8 | 1–32 GB | Development, testing |
| D-Series | 2–6 | 8–256 GB | Production workloads |
| E-Series | 2–64 | 16–432 GB | Memory-intensive apps |
| F-Series | 2–32 | 4–64 GB | Compute-intensive workloads |
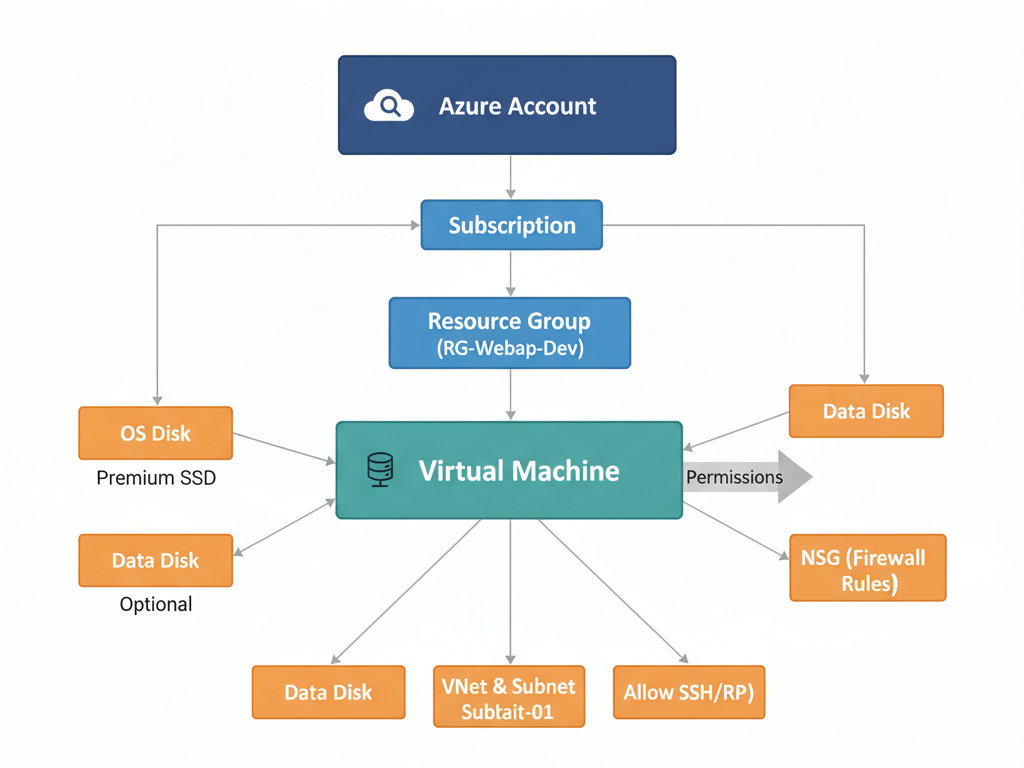
2. Step-by-Step VM Deployment (Hands-On)
- Step 1: Navigate to Azure Portal
- Go to Azure Portal
- Click “Create a Resource” → Compute → Virtual Machine
- Step 2: Configure Basics
- Subscription: Choose your active subscription
- Resource Group: Select or create (e.g., RG-WebApp-Dev)
- VM Name: VM-WebApp-01
- Region: e.g., East USImage: Ubuntu 22.04 LTS
- Size: B2s (2 vCPU, 4 GB RAM)
- Step 3: Administrator Account & Authentication
- Username: azureuser
- Authentication: SSH key (recommended) or Password
- SSH public key can be generated locally with ssh-keygen
- Step 4: Configure Disks
- OS Disk Type: Premium SSD
- Additional Data Disks: Optional
- Step 5: Networking Setup
- VNet/Subnet: Create new or select existing
- Public IP: Enable for remote access
- Network Security Group (NSG): Automatically created to allow SSH/RDP
- Step 6: Advanced Options
- Monitoring: Enable Azure Monitor and boot diagnostics
- Extensions: Optional (e.g., for configuration management)
- Step 7: Review + Create
- Validate configuration
- Click Create
- Deployment typically completes in 3–5 minutes
Diagram: VM Deployment Flow
3. Post-Deployment Tasks
- Connect to VM :-
- For Linux: ssh azureuser@bhavesh7499
- For Windows: RDP connection using provided credentials
- Install Web Server:
- Example for Ubuntu: sudo apt update && sudo apt install nginx -y
- Verify Connectivity:
- Navigate to in browser; Nginx welcome page should appear
Tip: Use tags and naming conventions (Environment=Dev, Owner=TeamA) to track VMs in multi-project environments.
4. High Availability & Scaling Considerations
- Availability Sets: Protect against hardware failures within a single region
- Availability Zones: Spread VMs across physically separate zones for disaster recovery
- Virtual Machine Scale Sets (VMSS): Auto-scale VMs based on demand
VM Redundancy Options
| Option | Purpose | Best For |
| Availability Set | Protect against single hardware failure | Small production apps |
| Availability Zone | High availability across zones | Critical production apps |
| VM Scale Set | Auto-scaling based on load | Web apps, APIs, microservices |
5. Security & Cost Optimization Tips
- Enable NSGs to control inbound/outbound traffic
- Use Managed Disks for secure, durable storage
- Shutdown unused VMs to save costs
- Leverage Reserved Instances for long-term workloads
- Monitor usage with Azure Monitor and Cost Management tools
Expert Advice: Becoming an Azure VM expert requires continuous hands-on practice, understanding compute sizing, and learning networking, storage, and monitoring concepts in parallel. Platforms like curiositytech.in provide practical labs to strengthen these skills.
Conclusion
Azure Virtual Machines are more than just compute resources—they are the building blocks for all cloud applications. By mastering VM deployment, configuration, networking, and scaling strategies, cloud engineers gain the confidence to manage production-ready environments efficiently. Integrating practical exercises from curiosity tech ensures learners progress from theory to expert-level profie, Azure compute resource, cloud engineer training, VM scale sets, Azure hands-on labs
efficiency.